Part 1 - Setting Up the Structure
This article is the first in a series demonstrating how to set up a data importer for your Microsoft Dynamics CRM 2011 installation. I have had great success using the software development kit to implement custom solutions, and so I am now writing to share what I know. At the time of this article, I am working with version CRM 2011 On Premise with UR15.
This solution is written using Visual Studio 2012 and C#, and may also be done in VB.Net. The development kit has samples and helper code in C# as well as VB.Net, so feel free to use your choice of language.
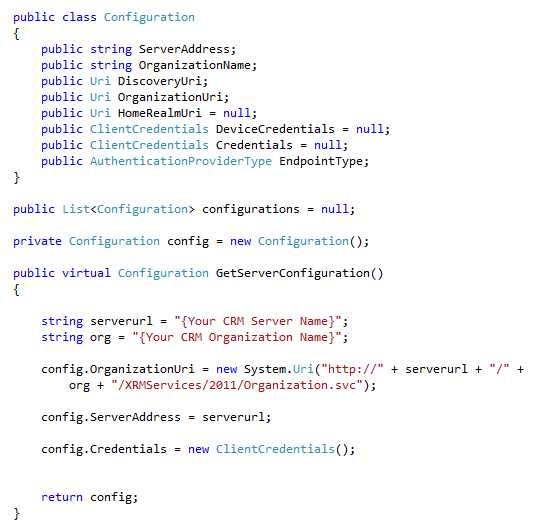
Next, add the following code within the ServerConnection class. This is the part that holds your server configuration (See Figure 4). I will not be discussing DiscoveryUri in detail. This is mainly when you need to find the CRM instance that you want to connect to. In our case, we are on CRM On-Premise and we know what our server and org names are.
Add the following variables to the class Program, making sure they are declared outside of the "static void Main(string[] args)" code block. These are the variables that will hold your connection and service information when you need to do work with the importer.
Add the following function to the Program class, making sure the code is outside of any other functions.
This code is getting the configuration of your CRM server from the helper class we created earlier, and then connecting to it with those configuration settings. The good news here is that once you've set this at the beginning of your import, you won't need to do it again. Also, since your settings are in one config file, there is only one place to go to change your settings, should you need to do so.
Lastly, call the function by adding the following code to your Main function.
You should be able to build your solution now and run it to see if there are any errors. All it is doing is connecting to your CRM system. The user running the code needs to also be a user in CRM, unless you want to use impersonation, which will not be covered in this series.
Related Links:
Part 2 - Beginning the Import Code Part 3 - Finishing the Import/Update Code
Part 4 - Reconciling More than One Match - Merging Accounts
 |
| Figure 1 |
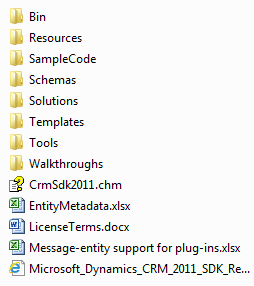
The first thing you will need to do is download the software development kit from Microsoft: http://www.microsoft.com/en-us/download/details.aspx?id=24004. What you get is an executable that will extract files to a folder. See figure 1.
Before I move on I should mention early binding versus late binding. Early binding has its advantages in that all type references are checked at compile time. I find this preferable due to the fact that you can see possible errors in type-casting before they happen, as well as the use of Visual Studio's IntelliSense. Late binding only checks types when the object is created or used. In order to use early binding, you'll need to generate a file that provides classes for each entity in your CRM implementation.
Here's how the parts of the script break down:
So now you are ready to start your project. Open Visual Studio 2012 and create a new project of type Console Application. You will need to reference the following two dll's from the SDK folder you downloaded earlier:
In Visual Studio, add a new class to your project and call it CrmServiceHelpers. Add the following references at the top of the page (see Figure 3) and a public class called ServerConnection.
Generating the Service Context File
To do this, you will need to generate code from a tool in the SDK. In the 'Bin' folder of the SDK there is an executable called crmsvcutil.exe, a command line tool. Make a note of the path for this file because you will need it when we create the script to generate the file for use in your project. The following sample shows a script that runs the CrmSvcUtil.exe from the location c:\CRM\sdk\bin, and outputs a file called MyServiceContext.vb to C:\CRM (see Figure 2). This may also be generated in VB.Net by changing the file extension and the /l switch.| Figure 2 |
Here's how the parts of the script break down:
- Command line tool in the SDK: c:\CRM\sdk\bin\CRMSvcUtil.exe
- Url for your CRM org (Replace {CRM Server} and {CRM Organization} with specifics from your instance of CRM):
/url:http://{CRM Server}/{CRM Organization}/XRMServices/2011/Organization.svc - Output file and location: /out:C:\Develop\CRM\MyServiceContext_New.cs
- Language switch: /l:CS
- Name of the service context (for use in your code): /servicecontextname:MyServiceContext
So now you are ready to start your project. Open Visual Studio 2012 and create a new project of type Console Application. You will need to reference the following two dll's from the SDK folder you downloaded earlier:
- microsoft.crm.sdk.proxy
- microsoft.xrm.sdk
- System.configuration
- System.ServiceModel
- System.Web.Services
- System.Xml.Linq
- System.Runtime.Serialization
Adding Service Helpers
In the samplecode folder of the SDK, under your language choice, then helpercode, there is a file called crmservicehelpers. There is more code in this file than I am using in this example, and it would be worthwhile to take some time to look through it. For now, I'll walk you through creating the class from scratch, just know that there are many other things you can do here.In Visual Studio, add a new class to your project and call it CrmServiceHelpers. Add the following references at the top of the page (see Figure 3) and a public class called ServerConnection.
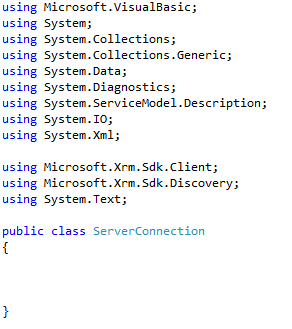 |
| Figure 3 |
Next, add the following code within the ServerConnection class. This is the part that holds your server configuration (See Figure 4). I will not be discussing DiscoveryUri in detail. This is mainly when you need to find the CRM instance that you want to connect to. In our case, we are on CRM On-Premise and we know what our server and org names are.
 |
| Figure 4 |
Creating the "Worker" Class
Rename the default class1.cs (the one that Visual Studio created for you) to Program.cs and add the following references to the top of the page.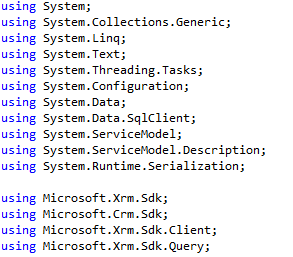 |
| Figure 5 |
Add the following variables to the class Program, making sure they are declared outside of the "static void Main(string[] args)" code block. These are the variables that will hold your connection and service information when you need to do work with the importer.
 |
| Figure 6 |
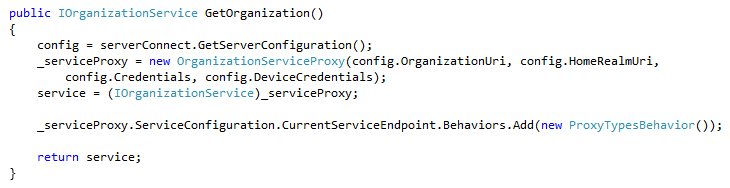
Add the following function to the Program class, making sure the code is outside of any other functions.
 |
| Figure 7 |
This code is getting the configuration of your CRM server from the helper class we created earlier, and then connecting to it with those configuration settings. The good news here is that once you've set this at the beginning of your import, you won't need to do it again. Also, since your settings are in one config file, there is only one place to go to change your settings, should you need to do so.
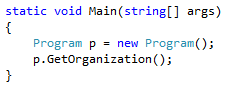
Lastly, call the function by adding the following code to your Main function.
 |
| Figure 8 |
You should be able to build your solution now and run it to see if there are any errors. All it is doing is connecting to your CRM system. The user running the code needs to also be a user in CRM, unless you want to use impersonation, which will not be covered in this series.
Related Links:
Part 2 - Beginning the Import Code Part 3 - Finishing the Import/Update Code
Part 4 - Reconciling More than One Match - Merging Accounts
Very well written and informative... Thx!
ReplyDeleteVery well written article. Absolutely helpful for new comers.
ReplyDeleteThank you for taking time to create this article.
-JB
I'm glad you found it helpful, JB!
DeleteExcellent way of explaining, and good article to obtain facts regarding my presentation subject matter, which i am going to present in academy. gmail login email
ReplyDeleteI admire this article for well-researched content and excellent wording. Thank you for providing such a unique information here. Mexico Import Data
ReplyDeleteGreat explanation of how custom data import can extend analytics insights. Understanding how to combine external data with analytics reporting is really valuable for making better data-driven decisions. For anyone interested in building deeper expertise in analytics and modern tech skills, exploring professional training in Data Science, Full Stack Development, or Digital Marketing can be a great way to strengthen practical knowledge and industry readiness.
ReplyDeleteGreat insights shared in this post! I really liked how the topic was explained in a clear and practical way. It’s always helpful to come across content that adds real value and is easy to understand. Looking forward to reading more posts like this.
ReplyDeleteUI/UX design course syllabus
Nice insights! Also refer Learn UI UX Design Course Online.
ReplyDeleteNice blog—personal websites like this are a great way to share thoughts, stories, and creative ideas in a simple and authentic way. It’s always interesting to explore individual perspectives through blogging.
ReplyDeleteAlso, to build practical digital skills, check out Learn Digital Marketing from Experts.
Nicely structured article.
ReplyDeleteSimple and effective explanation.
How to you become a data analyst
I found this article really helpful.
ReplyDeleteCheck this: Email Marketing Best Practices for Beginners