Part 4 - Reconciling More than One Match - Merging Accounts
So far, you have seen how to import new records and update existing records, if there is a match. But what happens when there is more than one match? Perhaps someone entered a duplicate account number in your system and it wasn't caught by other means. Just as you are able to merge records in the CRM interface, you can programmatically merge them in your code.
The question we are asking is, when you check an account number (from your remote system) against the CRM database, does it return more than one record? You don't want to update only the first one, because if the account number is the unique identifier in your remote system and there are two (or more) in CRM, your data will be inaccurate. You want to be able to update the Account and merge the duplicates on the fly. Here's how that's done.
Find Matched Records
The first thing you will need to check for is if your query matched more than one record. Remember, we checked to see if it existed if "i = 0" or if "i = 1". Now, if the service returns more than one, we will consider the first record the one that remains active, and merge the others to it. We'll need to set up variables to hold information on the target and subordinate account, as well as a marker letting us know that we already have our master record.
Open the Visual Studio project and find the end of the "if" statement. Add an "else if" to check the condition where i > 1. Add a boolean variable called bDoneOnce and set it to false. Add a variable of type "Account" and call it aMergeAct. Set it to the default value. Next, add a LINQ query to retrieve the IDs for the matching Accounts. Here's what the code should look like so far.
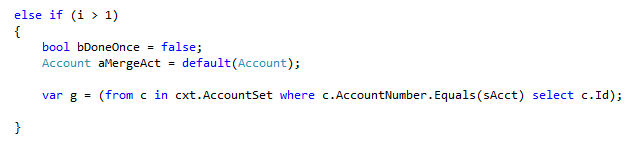 |
| Figure 22 |
Update the First Match
Now you need to loop through the result set. First, you need to create a MergeRequest (to do the work) and EntityReference (for the subordinate account). Then you will check the bDoneOnce variable to see if you already have a target account. If not, retrieve the account and update the fields. Set the bDoneOnce variable to True. Additional matches will be merged to the this Account.
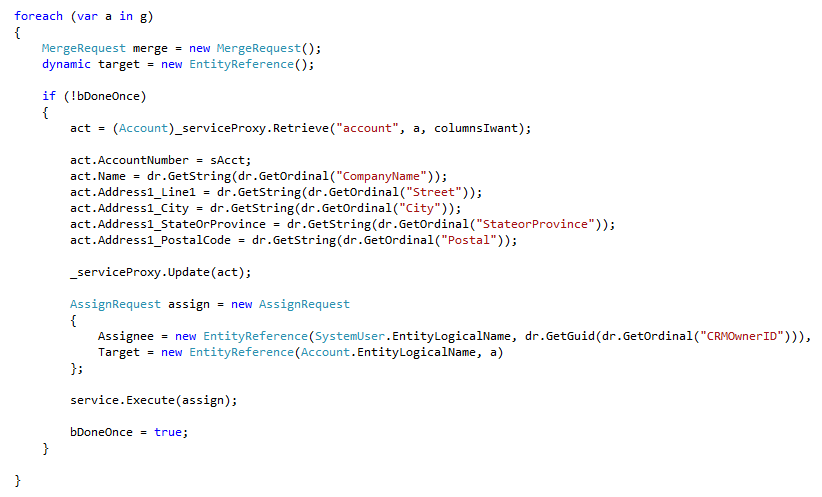 |
| Figure 23 |
Again, you can write a function to call the field and owner assignments, since we are repeating this for the adding, updating and merging of Accounts.
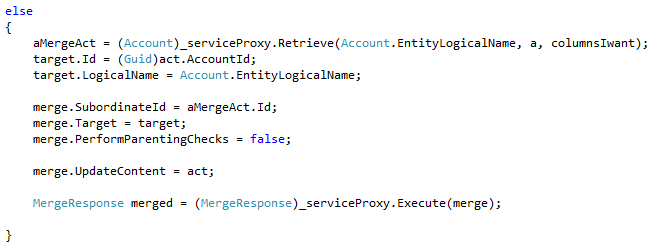
Now, create an "else" default condition. Assign the next account to the sMergeAct variable. You need to retrieve the Account using the service proxy Retrieve method. Pass it the entity name, ID of the Account, and the columns you want to retrieve. This is the subordinate record. Set up the target account information. Assign it the AccountId that you retrieved in the first part of this section, and the entity name.
Set Up the Merge Function
All you have left to do is set up the merge function. The subordinate id is the one from the aMergeAct that you retrieved. The target attribute is the target you set up. UpdateContent refers to the act that you are updating (from the first part of the code). Then call the Execute method.
 |
| Figure 24 |
That's really all there is to it. Keep in mind that there are many different ways to leverage the SDK and that this is merely one of them. There may be more posts in the future regarding different data types and batching for quicker imports. Leave me a reply and let me know if you are having issues or questions.
Happy Coding!
Related Links:
Part 1 - Getting Started
Part 2 - Beginning the Import Code
Part 3 - Finishing the Import/Update
Part 3 - Finishing the Account Import/Update
In part 2 of this series, we set up the shell that will connect to the database and retrieve records from your staging table. Now we want to loop through those records and add them to the database, if they don't already exist. I will also show how to update a CRM record if the program finds a match in the system.
Query CRM Records for a Match
Go to your code, inside the "while" block and after the assignment of the variable "sAcct". We are going to query the CRM service context to see if our account already exists in an active state in CRM, and then do a count of the results. We are using LINQ (Language Integrated Query) for this purpose. The next line of code will instantiate an integer variable and assign it the value of the total number of records returned by the query. Figure 15 shows an example of the code.
 |
| Figure 16 |
Add Record to CRM
Next, we will check the variable "i" and if it is equal to 0, we will add the account. Remember we created the "act" variable to hold the CRM Account entity. You can use IntelliSense to see that the variable holds all the attributes of the Account from your CRM system. Assign the "act" variable to a new instance of the Account, and then assign the attributes the values from your SQL record.
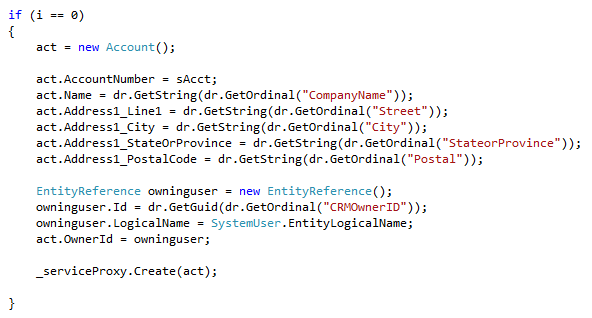 |
| Figure 17 |
Notice that when we assign the Owner ID, it's not as simple as the other attributes. This is because the Owner ID is actually a relationship between the Account and the SystemUser. First, you have to create an EntityReference. Then assign it an ID and tell it what the logical name (from CRM) should be. You can manually type it in, however best practices are to use the EntityLogicalName attribute from the Entity itself. Finally, assign this EntityReference to the OwnerID attribute on the Account.
The last line of code above calls the Create method on the CRM service, and adds the new Account to CRM.
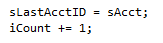
There are a couple of more things we need to do before we can test the importer. Outside of the "if" statement code block, assign the variable sLastAcctId the value of sAcct, and increment the value of iCount by 1. This will help us keep track in the event something breaks.
 |
| Figure 18 |
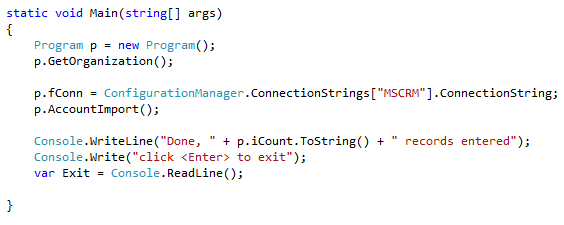
Lastly, go back to your Main function and add code to assign the variable fConn the value of your connection string from the config file. Call the AccountImport function you just wrote, and add a few lines to show the count of records entered. Your Main function should look something like figure 19.
 |
| Figure 19 |
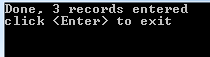
You are now ready to test your program. Be sure to add a few records to your tmpAccountImport table first. How did it go? Did your program run the first time? If not, were you able to find your errors? I would love to hear your questions and issues, if you're having any. If your code ran without error, your command window should look something like this:
 |
| Figure 20 |
Updating Records in CRM
This is great, you might say, but what if the records already exist in CRM and you just need to make changes to them? Even better, you have both types of records in your staging table and want the program to decide whether to do an import or an update. This is very simple to do, and is only slightly different from adding a record. Here's how.
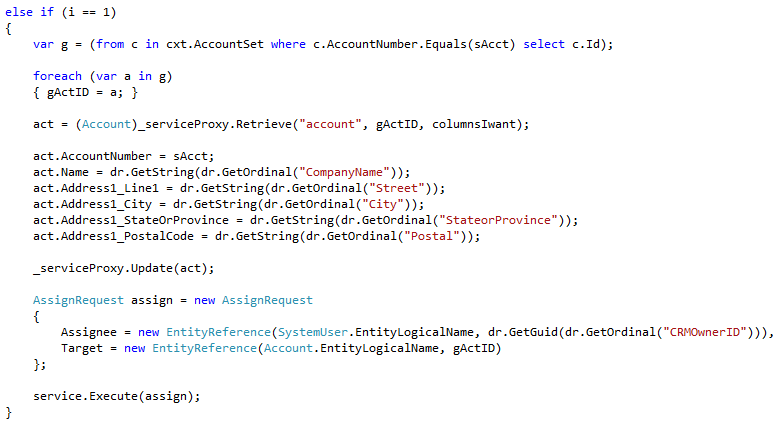
Navigate to the part of your code in the AccountImport function, just after the "if" statement when you are checking if i == 0. Add and else if statement and check if i equals 1. If it does, there is only one match and you can update this record. First, you need to retrieve the specifics of this account from CRM. You are going to query the service context to pull the Guid of the record with your AcctID, then retrieve the entire Account from the CRM system.
After that, assigning the values for the attributes is the same as when you are adding a record, with the exception of assigning the record to a new Owner. Assign the other attributes first, then execute the Account update against the server. Now you can initiate an AssignRequest variable, set the Assignee to the System User and the Target to the EntityLogicalName of the Account entity. Lastly, execute the AssignRequest against the CRM service. Figure 21 demonstrates this code.
 |
| Figure 21 |
Running your program again should update your existing records instead of adding them. If you are a stickler for reusable code (and you should be!), you will want to take the attribute assignments out of the "if" statements and put them in a separate procedure, that is called from both the add and update parts of the "if" statement.
We have one more scenario for discussion, and that is what happens when your program finds more than one match. If you have decided that the AccountNumber is your unique identifier of your source system, then if there are more than one of these in your CRM system they are duplicates. I'll cover these in Part 4 of this series.
Until then, happy coding!
Related Links
Part 1 - Getting Started
Part 2 - Beginning the Import Code
Part 4 - Reconciling More than One Match - Merging Accounts
Part 2 - Beginning the Import Code
Part 1 of this series showed you how to set up the connection to CRM in preparation for importing records from a SQL Server table. The reason you may want to do this is that you have SQL server data in another system, or you are receiving files from an outside data source that reside in a data warehouse. Part 2 is about writing the code to import records as Accounts in CRM 2011.
Create Your Staging Table
Creating a staging table for holding data temporarily while importing to CRM is helpful for several reasons. First, if the schema or data in the external system you are exporting changes, you only need to fix the part that exports this data to your SQL table. The worker code that imports data to CRM stays the same, because it is looking at the staging table. Secondly, depending on where the source data is housed, your import to CRM can take significantly less time. Such scenarios include your data warehouse being on a different server than your CRM, or the source data being in the cloud. If your staging table is on the same server as CRM, your import will be faster.
Notice I didn't state the same database, but the same server. In my experience, best practice includes creating a separate database for your custom tables and stored procedures, so that if there is a change to the deployed database where it needs to be dropped and rebuilt, your custom code doesn't go away with it.
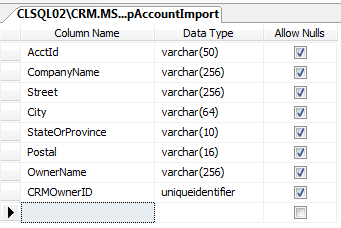
For this example we will create a new staging table in your support database. Naming conventions are personal, so feel free to use whatever names work for you. I have named my support database "MSCRM_Support" and created a staging table called "MSCRM_Support.dbo.tmpAccountImport". At the very least, create the staging table, add the following fields to it and then save the table:
 |
| Figure 9 |
I am not going to get into primary keys, indexes or nulls at this point. This is a separate topic for a possible later discussion.
The AcctId should be the unique identifier from the system you are importing from. In my case, I am importing it as a varchar but it can just as easily be any other type. This as well as the other fields, with the exception of OwnerID, should be populated from your source data. The OwnerName field is meant to bring over the owner from another system. In my case, there is an owner on the Accounts in the source data.
So now we need to find the CRM OwnerID that matches to your Owner name from the source record. What you need here is the SystemUserID (guid) from the SystemUserBase table, or SystemUser view. You will want to update the CRMOwnerID field in your tmpAccountImport table with this guid. Join the tmpAccountImport table with the SystemUserBase table in your main CRM database. You can join on a number of different fields, depending on what your source data looks like. Some appropriate fields could be FirstName, LastName, and FullName. Since my source data has the user's full name, we will be using that.
Here is an example of what your update query might look like:
 |
| Figure 10 |
So what if you are importing some records that already have an owner, and some that do not? What I do is designate a CRM user as a default user, and let the sales people assign the Accounts amongst themselves in the CRM system. In this case, you can simply update the tmpAccountImport table with the guid for your default user, whenever something doesn't match.
Now you have your staging table ready to import to CRM.
Creating the Structure for the Account Import Code
Start out by adding your connection string to the App.config file. Here's an example of what yours should look like. It should be within the tags but outside any of the others.
 |
| Figure 11 |
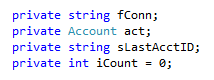
Now go back to Program.cs and add the variables from Figure 12, below. Put them just under the variables we added in Part 1 of this series. The fConn will hold our connection string. "act" is for the Account entity we are working with. sLastAcctId will hold the last Account information, in the event there is an error with the import we can tell which record broke it. iCount keeps count of the total number of records imported.
 |
| Figure 12 |
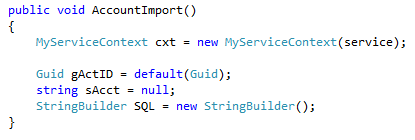
Create a new (void) function and call it AccountImport(). Put it in the Program class but outside of any other functions. Next you will need to create a variable of type MyServiceContext. Remember this was the file you created in Part 1 that holds the entities bound to your CRM service. Create a string variable and a new StringBuilder variable. The StringBuilder variable will hold the SQL to retrieve data from your temporary table. Also create variables to hold the Guid for the CRM Account ID and the string AcctID that you are importing. By now your code should look something like this:
 |
| Figure 13 |
Append to your StringBuilder variable the SQL statement that selects the records from your tmpAccountImport table. I would suggest checking for nulls in each of the fields. CRM sometimes doesn't like us to give it null values, an empty string is much better. Here's an example:
 |
| Figure 14 |
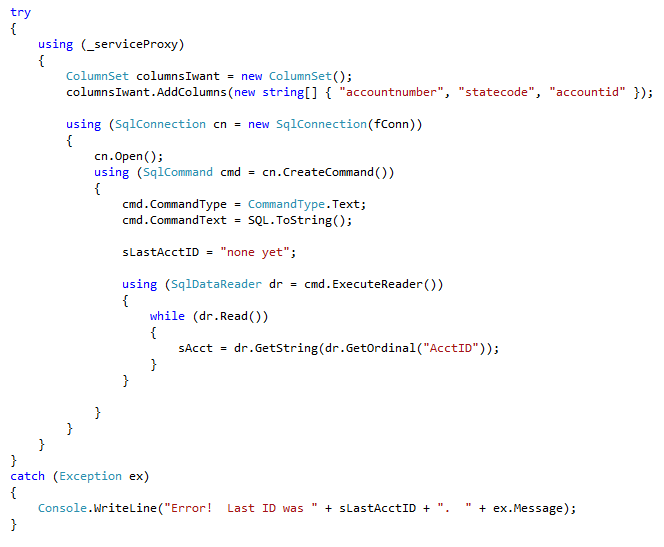
Next, add a try/catch block, connect to the _serviceProxy. Set up a new ColumnSet and add to it the names of fields that you need to see or compare in CRM. Columns are added as a string array, and the column names are the actual field names in CRM but they are case sensitive so make sure you are using actual names. Since we are importing/updating records, we only need to retrieve a few fields. Retrieving more than you need will slow down your import.
You can now add code to connect to the database and read through the records. Inside the "while" code block assign the sAcct variable the value of the "AcctId" field from the first record. . Your code should now look something like Figure 15:
 |
| Figure 15 |
This might seem like a lot but really there's not much new in this code. If you've coded in C# before, you've connected to a database a million times, probably much like the above code. The additional information here is in connecting to the CRM service itself and retrieving columns you need to use.
Part 3 of this series will finish out the import code and show how to use your connection string. Finally, we will write out the results of the import.
Related Links:
Part 1 - Getting Started
Part 3 - Finishing the Import/Update Code
Part 4 - Reconciling More than One Match - Merging Accounts
Part 1 - Setting Up the Structure
This article is the first in a series demonstrating how to set up a data importer for your Microsoft Dynamics CRM 2011 installation. I have had great success using the software development kit to implement custom solutions, and so I am now writing to share what I know. At the time of this article, I am working with version CRM 2011 On Premise with UR15.
This solution is written using Visual Studio 2012 and C#, and may also be done in VB.Net. The development kit has samples and helper code in C# as well as VB.Net, so feel free to use your choice of language.
 |
| Figure 1 |
Before I move on I should mention early binding versus late binding. Early binding has its advantages in that all type references are checked at compile time. I find this preferable due to the fact that you can see possible errors in type-casting before they happen, as well as the use of Visual Studio's IntelliSense. Late binding only checks types when the object is created or used. In order to use early binding, you'll need to generate a file that provides classes for each entity in your CRM implementation.
Generating the Service Context File
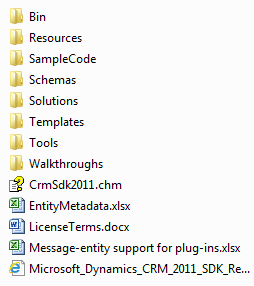
To do this, you will need to generate code from a tool in the SDK. In the 'Bin' folder of the SDK there is an executable called crmsvcutil.exe, a command line tool. Make a note of the path for this file because you will need it when we create the script to generate the file for use in your project. The following sample shows a script that runs the CrmSvcUtil.exe from the location c:\CRM\sdk\bin, and outputs a file called MyServiceContext.vb to C:\CRM (see Figure 2). This may also be generated in VB.Net by changing the file extension and the /l switch.
 |
| Figure 2 |
Here's how the parts of the script break down:
- Command line tool in the SDK: c:\CRM\sdk\bin\CRMSvcUtil.exe
- Url for your CRM org (Replace {CRM Server} and {CRM Organization} with specifics from your instance of CRM):
/url:http://{CRM Server}/{CRM Organization}/XRMServices/2011/Organization.svc
- Output file and location: /out:C:\Develop\CRM\MyServiceContext_New.cs
- Language switch: /l:CS
- Name of the service context (for use in your code): /servicecontextname:MyServiceContext
Run the script above from a command line and your service context file will be created in the output location that you indicated in the script. Be sure to remember where this is, because you will be copying this code into the project.
So now you are ready to start your project. Open Visual Studio 2012 and create a new project of type Console Application. You will need to reference the following two dll's from the SDK folder you downloaded earlier:
- microsoft.crm.sdk.proxy
- microsoft.xrm.sdk
You will also most likely need the following system dlls, in addition to the ones already created by Visual Studio:
- System.configuration
- System.ServiceModel
- System.Web.Services
- System.Xml.Linq
- System.Runtime.Serialization
Next, create a new class in the project. Call it MyServiceContext.cs. Go to the file you generated with the CrmSvcUtil. Delete everything from this new class, then copy all the contents from the MyServiceContext.cs generated file and paste it into the new class you created. The reason I suggest you do this rather than move the file into the project is because you may need to generate the file again if you add more fields to CRM. You don't want to over-write the file in your solution with the command line tool. In the event something unforeseen happens you will still have the old file.
Adding Service Helpers
In the samplecode folder of the SDK, under your language choice, then helpercode, there is a file called crmservicehelpers. There is more code in this file than I am using in this example, and it would be worthwhile to take some time to look through it. For now, I'll walk you through creating the class from scratch, just know that there are many other things you can do here.
In Visual Studio, add a new class to your project and call it CrmServiceHelpers. Add the following references at the top of the page (see Figure 3) and a public class called ServerConnection.
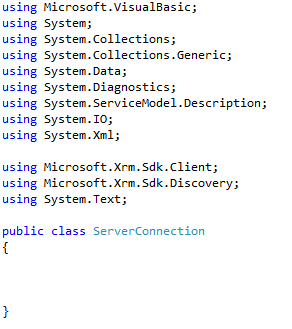 |
| Figure 3 |
Next, add the following code within the ServerConnection class. This is the part that holds your server configuration (See Figure 4). I will not be discussing DiscoveryUri in detail. This is mainly when you need to find the CRM instance that you want to connect to. In our case, we are on CRM On-Premise and we know what our server and org names are.
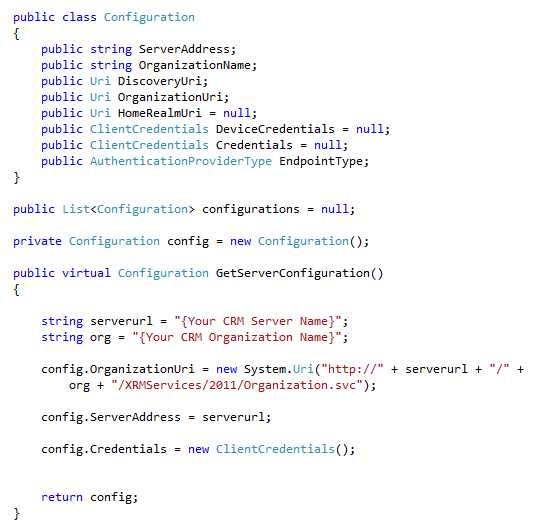 |
| Figure 4 |
Creating the "Worker" Class
Rename the default class1.cs (the one that Visual Studio created for you) to Program.cs and add the following references to the top of the page.
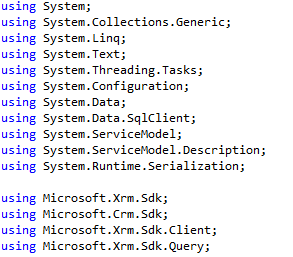 |
| Figure 5 |
Add the following variables to the class Program, making sure they are declared outside of the "static void Main(string[] args)" code block. These are the variables that will hold your connection and service information when you need to do work with the importer.
 |
| Figure 6 |
Add the following function to the Program class, making sure the code is outside of any other functions.
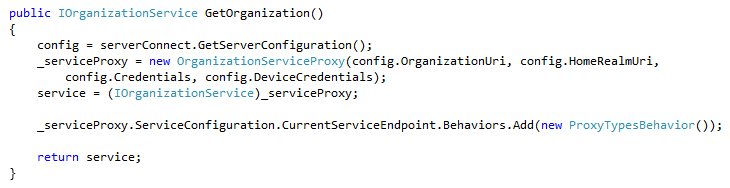 |
| Figure 7 |
This code is getting the configuration of your CRM server from the helper class we created earlier, and then connecting to it with those configuration settings. The good news here is that once you've set this at the beginning of your import, you won't need to do it again. Also, since your settings are in one config file, there is only one place to go to change your settings, should you need to do so.
Lastly, call the function by adding the following code to your Main function.
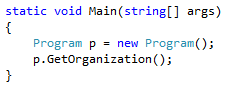 |
| Figure 8 |
You should be able to build your solution now and run it to see if there are any errors. All it is doing is connecting to your CRM system. The user running the code needs to also be a user in CRM, unless you want to use impersonation, which will not be covered in this series.
Related Links:
Part 2 - Beginning the Import Code Part 3 - Finishing the Import/Update Code
Part 4 - Reconciling More than One Match - Merging Accounts